Home > Articles > Access Serial Ports with Visual Basic .NET
Access Serial Ports with Visual Basic .NET
This article originally appeared in the April 2008 Nuts & Volts.
Also see Access Serial Ports with PICBASIC.
If you have a microcontroller circuit that needs to talk to a PC, a serial port can do the job. Serial ports can transfer data for just about any purpose. For example, a microcontroller can send sensor data for a PC to analyze and display. Or a PC can send commands to control robots or other devices.
No serial port on your PC? No problem. To add a serial port, attach a USB/serial adapter to a USB port.
This article focuses on the PC side of serial-port communications. I’ll show how to use Visual Basic .NET to access serial ports, including USB virtual serial ports.
Serial Ports and COM Ports
A serial port is a computer interface that transmits bits one at a time. The interface can have as few as three lines: one to carry data in each direction plus a ground line. Many interfaces have up to six additional lines to carry status and control information.
Unlike some serial interfaces, the standard RS-232 serial interface on PCs doesn’t include a clock line. Instead, the computers at both ends of the cable each provide a clock. The computers must agree on a bit rate for transferring data, and a Start bit synchronizes the clocks before each transmitted byte.
RS-232 is a hardware interface that transmits 0s and 1s as positive and negative voltages. A typical RS-232 cable can be up to 100 ft long. Interface chips such as Maxim’s MAX232 converts between 5V logic and RS-232 voltages.
On a PC, serial ports appear as numbered COM ports that applications can read and write to. These days, most standard peripherals connect via USB, and many PCs don’t have built-in serial ports. But you can add an RS-232 port to any recent PC by attaching a USB/RS-232 adapter module. Your favorite PC hardware vendor likely has a selection to choose from.
For each adapter, Windows creates a USB virtual COM port that applications can access just like built-in serial ports. If you don’t want to use an external adapter, you can perform the conversion inside the device by adding a USB/serial bridge chip to your design. FTDI’s FT232R is an example of a bridge chip.
Selecting a Port
Figure 1 shows a Windows Form for an application that uses a serial port to control an LED on a remote device.
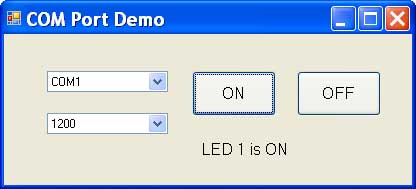
Figure 1. Clicking a button sends a command and displays a response.
(The full Visual Basic project is available from janxelson.com.)
Combo boxes enable selecting a COM port and bit rate. Clicking the “ON” or “OFF” button sends a command to turn an LED on the remote device on or off. A label displays a message about the state of the LED as reported by the device.
This example can serve as a framework for developing applications that monitor and control other external devices.
Microsoft’s Visual Basic .NET, including the free Express edition, includes a SerialPort class for accessing COM ports. Other .NET languages such as Visual C# can use the class as well.
In applications that use the SerialPort class, include an Imports statement to avoid having to specify the namespace each time you use a class member. Place the statement at the top of the file, preceding the Module or Class statement and following any Option statements:
Imports System.IO.Ports
Before you can access a port, you need to create a SerialPort object. This statement creates a SerialPort object called myComPort:
Dim myComPort As New SerialPort
Listing 1 shows a routine that finds COM ports on the system and sets a default port and other parameters. To run the routine when the application starts, call the routine in the Form_Load event.
The SerialPort class’s GetPortNames method returns an array of the names of all of the PC’s COM ports. The array’s elements aren’t guaranteed to be in alphabetical order, but the Array.Sort method can sort the names if needed. The SelectedIndex property sets the default COM port.
The cmbPorts combo box displays the COM ports. The cmbBitRate combo box lists the supported bit rates. The SelectedItem property sets the default bit rate.
Accessing a Port
The OpenComPort routine (Listing 2) sets port parameters and attempts to open the selected port. The routine sets myComPort’s PortName and BaudRate properties to match the selections in the combo boxes. (For the purposes of this discussion, the bit rate and baud rate are the same thing.)
For other properties such as the number of data bits and parity type, the routine sets values. To enable users to change these properties, you can add combo boxes that offer options for these properties.
The ReadTimeout and WriteTimeout values set the number of milliseconds the application will wait when attempting to read or write to the port. For read operations, the timeout sets how long the application will wait for data after calling a read method. For write operations, the timeout sets how long the application will wait to finish a write operation. Flow-control methods can delay writing to a port if the receiving computer isn’t ready to accept data.
Before reading or writing to a port, the application must open a connection to the port. The Open method opens a connection to the port named in the PortName property. If the selected port doesn’t exist, is already open, or can’t be opened for another reason, a message box appears describing the problem.
The CloseComPort routine (Listing 3) closes an open port and releases its resources. The form’s FormClosing event can call this routine to close the port when the application ends. The routine waits for any transmitting bytes to finish transmitting or a timeout. The Using block’s End Using statement closes myComPort and disposes of its resources.
Closing a port can take up to a few seconds, so applications and users should delay a bit between closing a port and re-opening the same port.
When a user selects a new COM port in the cmbPorts combo box, the combo box’s SelectedIndexChanged event executes. Placing this code in the event’s routine closes the previously selected COM port if needed, sets myComPort’s PortName property to match the new selected port, and opens the selected port:
CloseComPort()

    myComPort.PortName = _

    cmbPorts.SelectedItem.ToString

    OpenComPort()
When a user selects a new bit rate in the cmbBitRate combo box, the combo box’s SelectedIndexChanged event executes. Placing this code in the event’s routine sets myComPort’s BaudRate property to match the selected bit rate:
myComPort.BaudRate = _

    CInt(cmbBitRate.SelectedItem)
Each button on the form has a click event, which calls the SendCommand routine to send a command to the COM port. Place this code in the ON button’s click event to sends the command “L11”:
SendCommand("L11")
The first two bytes (“L1”) identify LED 1 on the device. The third byte “1” tells the device to turn on LED 1.
Place this code in the OFF button’s click event to send “L10” to tell the device to turn off LED 1:SendCommand("L10")
Listing 4 is the SendCommand routine. The WriteLine method writes the command and a line-feed (LF) code (0Ah) to the port. Using the SerialPort class’s default encoding, each text character transmits as an 8-bit ASCII code.
The application waits to receive a response that ends with a LF. On receiving a response, a label on the form (lblStatus) displays a message. If the device doesn’t respond after the number of milliseconds in ReadTimeout, a message box displays an error message.
You can request other actions from the remote device by modifying or adding to the commands and responses. To automate the communications, a Timer component’s Tick event can send commands at intervals.
Detecting Received Data
In the example application, the device sends data only when the PC application requests it. If your device sends data at unpredictable times, the DataReceived event can detect data when it arrives.
Listing 5 shows how to use the event to retrieve data. The SerialPort class’s DataReceived code runs in a different program thread.
For this reason, if you retrieve received data in a DataReceived event and want to display the data on the application’s form, you need to define a delegate to pass the data to the form. For an example of how to do so, see the ComPortTerminal example at janaxelson.com.
Another way to detect received data is to use a Timer component to check for new data at intervals.
More on Transferring Text
The example application sends and receives data, including numbers, as codes that represent text characters. For example, to send “1”, the port transmits the byte 31h (00110001), which is the ASCII code for the character 1. To send “111”, the port transmits 31h three times, once for each character in the number.
Treating data as text is the obvious choice for transferring strings or files that contain text. To transfer numeric values, one option is to send the bytes as text in ASCII Hex format.
Any byte value can be expressed as a pair of hexadecimal (base 16) characters where the letters A–F represent values from 10 to 15.
For example, consider the decimal number:
225
Expressed as a binary value, it’s (2^7) + (2^6) +(2^5) +(2^0), or:
11100001
In hexadecimal, it’s:
E1
The ASCII codes for the characters “E” and “1” expressed in hexadecimal are:
45 31
01000101 00110001
A serial link using ASCII Hex format sends the decimal value 225 by transmitting the two bytes above. A computer that receives ASCII Hex values can convert the characters to numeric values or use the data as is.
An advantage to ASCII Hex is being able to represent any byte value using just 16 ASCII codes. The values 30h–39h represent the characters 0–9, and 41h–46h represent the characters A–F. Code that allows lower-case letters uses 61h–66h to represent a–f.
All of the other values are available for alternate uses, such as software flow-control codes or an end-of-file indicator. Because the ASCII Hex codes are all less than 80h, a serial link transmitting ASCII Hex values can save a little time by ignoring the high bit and transmitting 7-bit values.
Listing 6 shows Visual Basic functions for converting between binary values and ASCII hex Strings.
Listing 4 used WriteLine and ReadLine to exchange data. The SerialPort class provides several other options for reading and writing text. To send a string without appending a LF, use the Write method. The Write method can also write a Char array to a port. The ReadExisting method in Listing 5 returns immediately with everything in the receive buffer or an empty string if the buffer is empty. The ReadTo method is like ReadLine but enables defining any character as the delimiter. The Read method copies received characters into a Char array.
If those options aren’t enough, you can use the SerialPort object’s BaseStream property to obtain a Stream object for transferring text data. For more on any of these methods, see .NET’s Help.
Transferring Binary Data
A disadvantage of using ASCII Hex for numeric data is that each byte value uses two characters, so data takes twice as long to transfer.
Also, in most cases the application at each end must convert between ASCII Hex and binary.
With binary data, values aren’t converted to text characters. The decimal value 1 transmits as 00000001 rather than as the ASCII code for the character “1”. With binary data, any value from 0 to 255 can transmit as a single byte. When sending or receiving binary data, the SerialPort object assumes nothing about what the values mean.
A way to transmit binary data is to place the bytes in an array. This example creates a 3-byte array and writes the array’s contents to a port:
Dim byteBuffer(2) As Byte
byteBuffer(0) = 85

    byteBuffer(1) = 83

    byteBuffer(2) = 66
myComPort.Write(byteBuffer, 0, 3)
The SerialPort class provides two methods for reading bytes.
The Read method can copy a specified number of received bytes from the receive buffer into a byte array beginning at a specified offset.
This example reads up to three received bytes, stores the bytes beginning at offset 0 in the byteBuffer array, and displays the result:
Dim byteBuffer() As Byte = {0, 0, 0}
myComPort.Read(byteBuffer, 0, 3)
The Read method doesn’t wait for the specified number of bytes to arrive but returns when there is at least one received byte. If no bytes arrive, the method times out when the ReadTimeout time has elapsed.
Another option for reading bytes is the ReadByte method, which reads one byte at a time:
Dim receivedByte As Integer
receivedByte = myComPort.ReadByte
The ReadByte method reads a byte but returns an Integer with its high bytes set to zero. As with text data, Stream objects are another option for transferring binary data.
Links
USB/serial bridge chips
Future Technology Devices International Limited (FTDI)
RS-232 and RS-485 interface chips
Maxim Integrated Products
Visual Basic Express Edition
Microsoft
Copyright Jan Axelson 2008-2009