Access Flash Drives with a Microcontroller
Jan Axelson
This article originally appeared in Nuts & Volts.
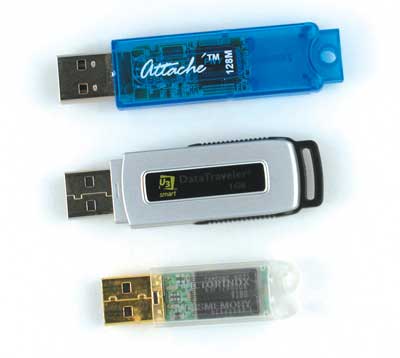
USB flash drives provide a handy way to store any type of information in a small package. The drives, also known as thumb drives and USB keys, seem ideal for use in data loggers and other microcontroller-based projects. But to access files in a flash drive, a microcontroller must have USB host hardware and support for a file system. Microcontroller-based devices often lack these elements.
To the rescue is the USBwiz chip from GHI Electronics. With the USBwiz, just about any microcontroller can read and write to files in flash drives. The microcontroller can access the USBwiz via an asynchronous serial (UART) port or an SPI or I2C port. Most microcontrollers support one or more of these ports. The USBwiz can also access USB hard drives and flash-memory cards such as MultimediaCards (MMCs) and Secure Digital (SD) Cards.
In this article, I'll show how to use the USBwiz to create a file in a flash drive, write to the file, and read the file's contents. I'll also show how to control the USBwiz from a PC using a terminal utility or Visual Basic. When you have working code on the PC, you can port the code to your microcontroller of choice.
About Flash Drives and USB
A USB flash drive is a USB device that contains flash memory that PCs and other USB hosts can access in the same way as other drives.
If you attach a flash drive to a USB port on a PC, Windows assigns a drive letter and shows the drive in My Computer.
Current flash drives have capacities as large as 8 gigabytes, which is more than enough for the data a small system might need to store and access.
Every USB communication is between a host and a device. The host contains host-controller hardware and manages communications on the bus. The device contains device-controller hardware and responds to communications from the host. Host hardware and code are more complex than device hardware and code.
PCs contain host controllers and thus can communicate with USB devices, including flash drives. Most microcontrollers with USB support contain device controllers. A microcontroller that wants to access flash drives or other USB devices must have a host controller embedded in the microcontroller or accessed on a separate chip. This is where the USBwiz comes in.
Inside the USBwiz
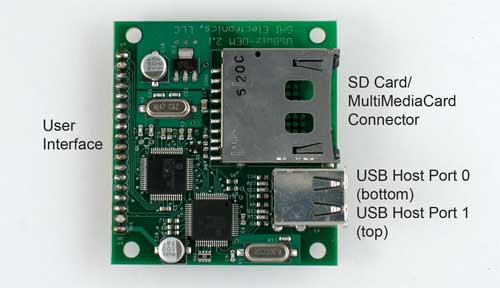
The USBwiz is a programmed Philips LPC2141 microcontroller based on a 16/32-bit ARM processor core. For USB communications, the chip interfaces to a Philips ISP1160 USB host controller. The USBwiz-OEM board contains both chips, two USB connectors, a connector for an SD Card or MultiMediaCard, and a user interface that brings out connections for powering and communicating with the circuits.
The user interface is a line of holes that accepts an 18-pin SIP header (which you provide). You can plug the header into a breadboard or mating receptacle or solder the header directly to a circuit board.
GHI Electronics provides free USBwiz firmware that supports a command set for communicating with the board. All commands and responses are ASCII text. A bootloader program loads the firmware into the USBwiz from an SD Card or MultiMediaCard.
This article focuses on communications with USB drives. The USBwiz can also talk with USB mice, some printers, some modems/cell phones, and USB device controllers from FTDI.
A Setup for Experimenting
The USBwiz is ideal for microcontroller communications, but sometimes the easiest way to check out a new device is to hook it up to a PC and use its resources to run and debug code. When you have everything working, you can port the code to your microcontroller of choice.
To interface the port to a USB port on a PC, I used a DLP Designs DLP-USB232M USB Adapter Board, which comes in a handy dual in-line package (DIP). You can build this circuit on a breadboard:
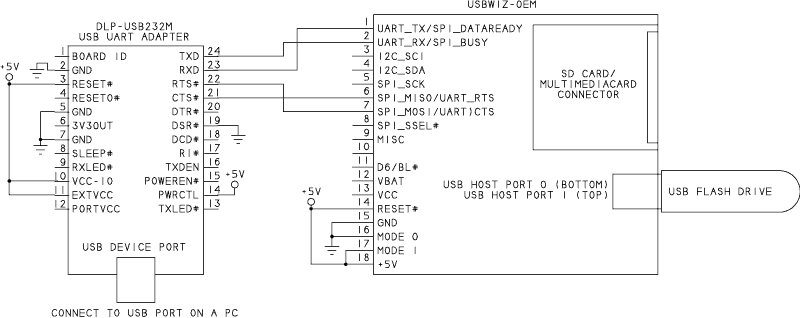
If your PC has an RS-232 serial port or a USB/RS-232 adapter, you can replace the DLP-USB232M with a Maxim Semiconductor MAX233 or similar chip that converts between async. serial and RS-232 voltages.
With the circuit connected to a PC, you can use a terminal utility or just about any programming language to communicate with the USBwiz via a COM port.
USBwiz Communications
Every USBwiz command must be followed by a CR code (ASCII 0Dh). After receiving a command and CR, the USBwiz returns a status code followed by a CR. A code of "!00" indicates success. For some commands, the USBwiz follows the status code with additional information, or the sender of the command sends additional information as described below.
Windows includes a terminal utility called Hyperterminal, but I don't recommend using it with the USBwiz. To view what you're typing and the responses, you want the terminal's display to add a line feed (LF) to each CR sent and received without sending LFs to the USBwiz. I couldn't find combination of settings that would do this in Hyperterminal.
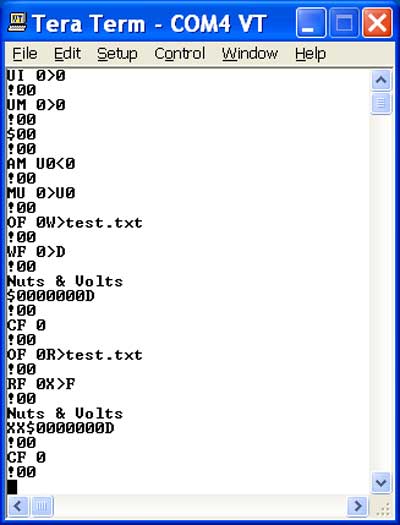
Instead I used the free TeraTerm Pro. In TeraTerm Pro, under Setup > Serial Port, set Port to the COM port your device uses and set Baud rate = 9600, Data = 8 bit, Parity = none, Stop = 1 bit, and Flow control = none. If the port uses a USB/serial adapter, the adapter will need to be attached before TeraTerm will list it. Under Setup > Terminal, set New-line Receive to CR+LF and New-line Transmit to CR. Check the Local echo checkbox. You're now ready to start sending commands to the USBwiz:
If you have another favorite terminal utility, you can probably use it by setting the options as described above.
I'll show some of the essential commands for accessing files on flash drives. The USBwiz's User Manual documents many more commands, including commands that access other device types.
The Commands
Before reading and writing to files on flash drive, the USBwiz must receive and execute four commands.
USB hosts learn about attached devices by sending a series of requests in a process called enumeration. The device returns a series of data structures called descriptors, which describe the device's functions and capabilities. A flash drive sends descriptors that tell the host that the device belongs to USB's mass-storage class. The host then knows it can use mass-storage protocols to communicate with the device.The UI command causes the USBwiz to enumerate an attached USB Device:
UI p>h
where p is the port number and h is the device handle to assign to the device.
The USBwiz-OEM board has two USB connectors, Port 0 on the bottom and Port 1 on top. This command enumerates the device on Port 0 and assigns device handle 0:
UI 0>0
The UM command registers an enumerated USB mass-storage device and assigns a mass-storage handle for communicating with the device:
UM h>m
where h is the assigned device handle and m is the mass-storage device handle to assign to the device.
This command assigns mass-storage handle 0 to the device with device handle 0:UM 0>0
After executing the UM command and returning a status code of !00, the USBwiz returns "$" followed by the number of the highest logical unit (LUN) in the media:
$00
On a PC, each LUN corresponds to a drive letter. Partitioned drives have multiple LUNs. Flash drives typically have just one LUN, numbered zero.
The AM command prepares the USBwiz to communicate with a mass-storage device and checks to ensure the storage media is available:
AM Um<n
where m is an assigned mass-storage handle and n is the LUN.
This command prepares to communicate with LUN 0 in the device with mass-storage handle 0:
AM U0<0
Note that this command uses "<" rather than ">".
To read and write to a file, the USBwiz must mount a file system to the device. The MU command mounts a file system to a mass-storage device:
MU m>Un
where m is the file system and n is the mass-storage handle of a USB device. The USBwiz supports up to three independent file systems.
This command mounts file system 0 on the USB device with mass-storage handle 0:
MU 0>U0
If the USBwiz returns !00 in response to each of the above commands, you're ready to read and write to files.
Accessing Files
Before you can write to a file, you need to open it. The OF command opens a file:
OF nM>filename
where n is a file handle, filename is the name of the file, and M is the read or write mode. Set M to "W" to overwrite any existing file of the same name, "A" to append to an existing file, or "R" to read from the file.
This command opens the file "test.txt" for overwriting using file handle 0:OF 0W>test.txt
If the file doesn't exist, the USBwiz creates it.
The WF command writes to an open file:
WF n>ssssssss
where n is the file handle and ssssssss is the amount of data to write expressed in ASCII hex. (ASCII hex means the value is hexadecimal and expressed as text using the characters 0-9 and A-F.)
This command writes 13 (0Dh) bytes to the file opened with file handle 0:
WF 0>D
On receiving a valid WF command, the USBwiz returns !00, waits to receive the specified number of bytes, and returns "$" followed by the number of bytes written and !00:
!00
Nuts & Volts
$0000000D
!00
(The text "Nuts & Volts" followed by a CR is 13 bytes.)
The CF command closes an open file and frees the file handle:
CF n
where n is the handle.
This command closes file handle 0:
CF 0
This command opens the file test.txt for reading:
OF 0R>test.txt
The RF command reads from a file:
RF nM>ssssssss
where n is a previously obtained file handle, M is a filler character, and ssssssss is the number of bytes to read expressed as ASCII hex. If the requested number of bytes aren't available, the USBwiz inserts the filler character for the missing bytes.
This command requests to read 15 (0Fh) bytes from a file opened with file handle 0 using "X" as the filler character:
RF 0X>0000000F
On receiving a valid RF command, the USBwiz returns !00 followed by the requested data, filler characters if needed, "$", the number of bytes read, and !00:
RF 0x>F
!00
Nuts & Volts
XX$0000000D
!00In the example above, the command requested two more bytes than the file contained, so the file's contents were followed by two filler characters.
An option to give your programming a quick start is the free Microchip C library for the USBwiz available from GHI Electronics.
Using Visual Basic to Access the USBwiz
You can also write applications to communicate with the USBwiz. Microsoft's .NET Framework 2.0 includes a SerialPort class for accessing hardware that uses a COM-port interface. This includes devices connected to USB/serial converters such as the DLP-USB232M module. You can run the Visual Basic code below using the free Visual Basic 2005 Express edition available from Microsoft.
Complete Visual Basic application that accesses the USBwiz.
Configuring the COM Port
This statement defines SelectedPort as a member of the SerialPort class:
Friend SelectedPort As System.IO.Ports.SerialPort
These statements set port parameters and open a COM port in Visual Basic .NET:
selectedPort = My.Computer.Ports.OpenSerialPort( "COM4", 9600, Parity.None, 8, StopBits.One)
selectedPort.Handshake = Handshake.RequestToSend
selectedPort.ReadTimeout = 1000
selectedPort.WriteTimeout = 1000The NewLine property defines what is considered the end of a line for the ReadLine and WriteLine methods. Because the USBwiz uses a carriage return only, NewLine should be set to the Visual-Basic constant vbCr:
selectedPort.NewLine = vbCr
Accessing Files
The WriteLine and ReadLine methods send data to the port and read data received on the port. WriteLine adds a NewLine character to the end of the data being sent. ReadLine returns all received data up to a NewLine character and discards the NewLine character.
This statement writes a UI command and CR to a serial port:
SelectedPort.WriteLine("UI 0>0")
The ReadLine method can read a response code returned by the USBwiz:
Dim response As String = ""
response = SelectedPort.ReadLineThis statement requests to open the file "test.txt" using file handle 0 for writing:
selectedPort.WriteLine("OF 0W>test.txt"
This statement requests to write 3 bytes to the opened file with file handle 0:
selectedPort.WriteLine("WF 0>3")
After sending this command and receiving a response of "00!", the application should send the bytes to write to the file without adding a CR code to the end (unless desired). The Write method does the job:
Dim bytesToSend as byte()
bytesToSend(0) = 78 ' ASCII "N"
bytesToSend(1) = 38 ' ASCII "&"
bytesToSend(2) = 86 ' ASCII "V"
selectedPort.Write(bytesToSend, 0, bytesToSend.GetLength(0))This statement requests to read 3 bytes from the open file with file handle 0 and filler character "X":
selectedPort.Read("RF 0X>3"
After returning a response code, the USBwiz returns the requested data. The Read method reads the data:
Dim bytesRead As Integer
Dim bytesToRead as Integer
Dim receiveBuffer() As Byte
bytesToRead = 3
ReDim receiveBuffer(bytesToRead - 1)
bytesRead = selectedPort.Read(receiveBuffer, 0, bytesToRead)